Successfully performing emergency ultrasound using the FAST protocol
__
By Héloïse Guillot / January 14, 2025
FAST ultrasound: a key tool in emergency medicine
diSplay U/S, online ultrasound simulator
FAST module
- FAST protocol available on InSimo online ultrasound simulator diSplay U/S
- Module developed in partnership with Strasbourg IHU
- 6 guided exercises to learn the fundamentals of the FAST ultrasound
- 7 clinical cases: horse falls, frontal impacts, motorcycle accidents
The FAST ultrasound (Focused Assessment with Sonography for Trauma) has become an essential protocol in emergency medicine.
Designed to quickly assess the presence of fluids in the thoracic and abdominal cavities, it helps detect potentially life-threatening internal bleeding, often within minutes [7].
Thanks to its simplicity, its effectiveness and non-invasive nature, the FAST protocol fits perfectly into the initial management of trauma patients [10].
The ability to perform this examination effectively is crucial for making quick clinical decisions. In this article, we provide a guide to successfully completing your FAST ultrasound exam, with practical tips and techniques to optimize your performance.
We will explore this topic through the lens of learning the FAST protocol using the diSplay U/S online ultrasound simulator.
The FAST protocol in detail
This protocol is primarily indicated in cases of abdominal or thoracic trauma. It is particularly useful for:
Unstable polytrauma patients, to quickly guide operative decisions [9].
Victims of blunt or penetrating trauma, when internal bleeding is suspected [4].
Pre-hospital medicine contexts, to assess severity and prioritize evacuation [6].
Critical situations such as evaluating hypovolemia or suspected cardiac tamponade [8].
The FAST protocol offers many advantages, which explains its growing use[2] :
FAST
A FAST exam can be performed in less than 5 minutes, which is a major advantage in emergency situations where every second counts.
NON-INVASIVE
Unlike other imaging techniques, ultrasound does not expose the patient to the risks associated with radiation, as is the case with X-rays.
PORTABLE
Ultrasound devices are becoming increasingly compact, making FAST accessible even outside of the hospital (for example, at the scene of an accident).
EFFECTIVE
The use of FAST allows for the early detection of significant fluid accumulation, thereby guiding rapid therapeutic decisions [12].
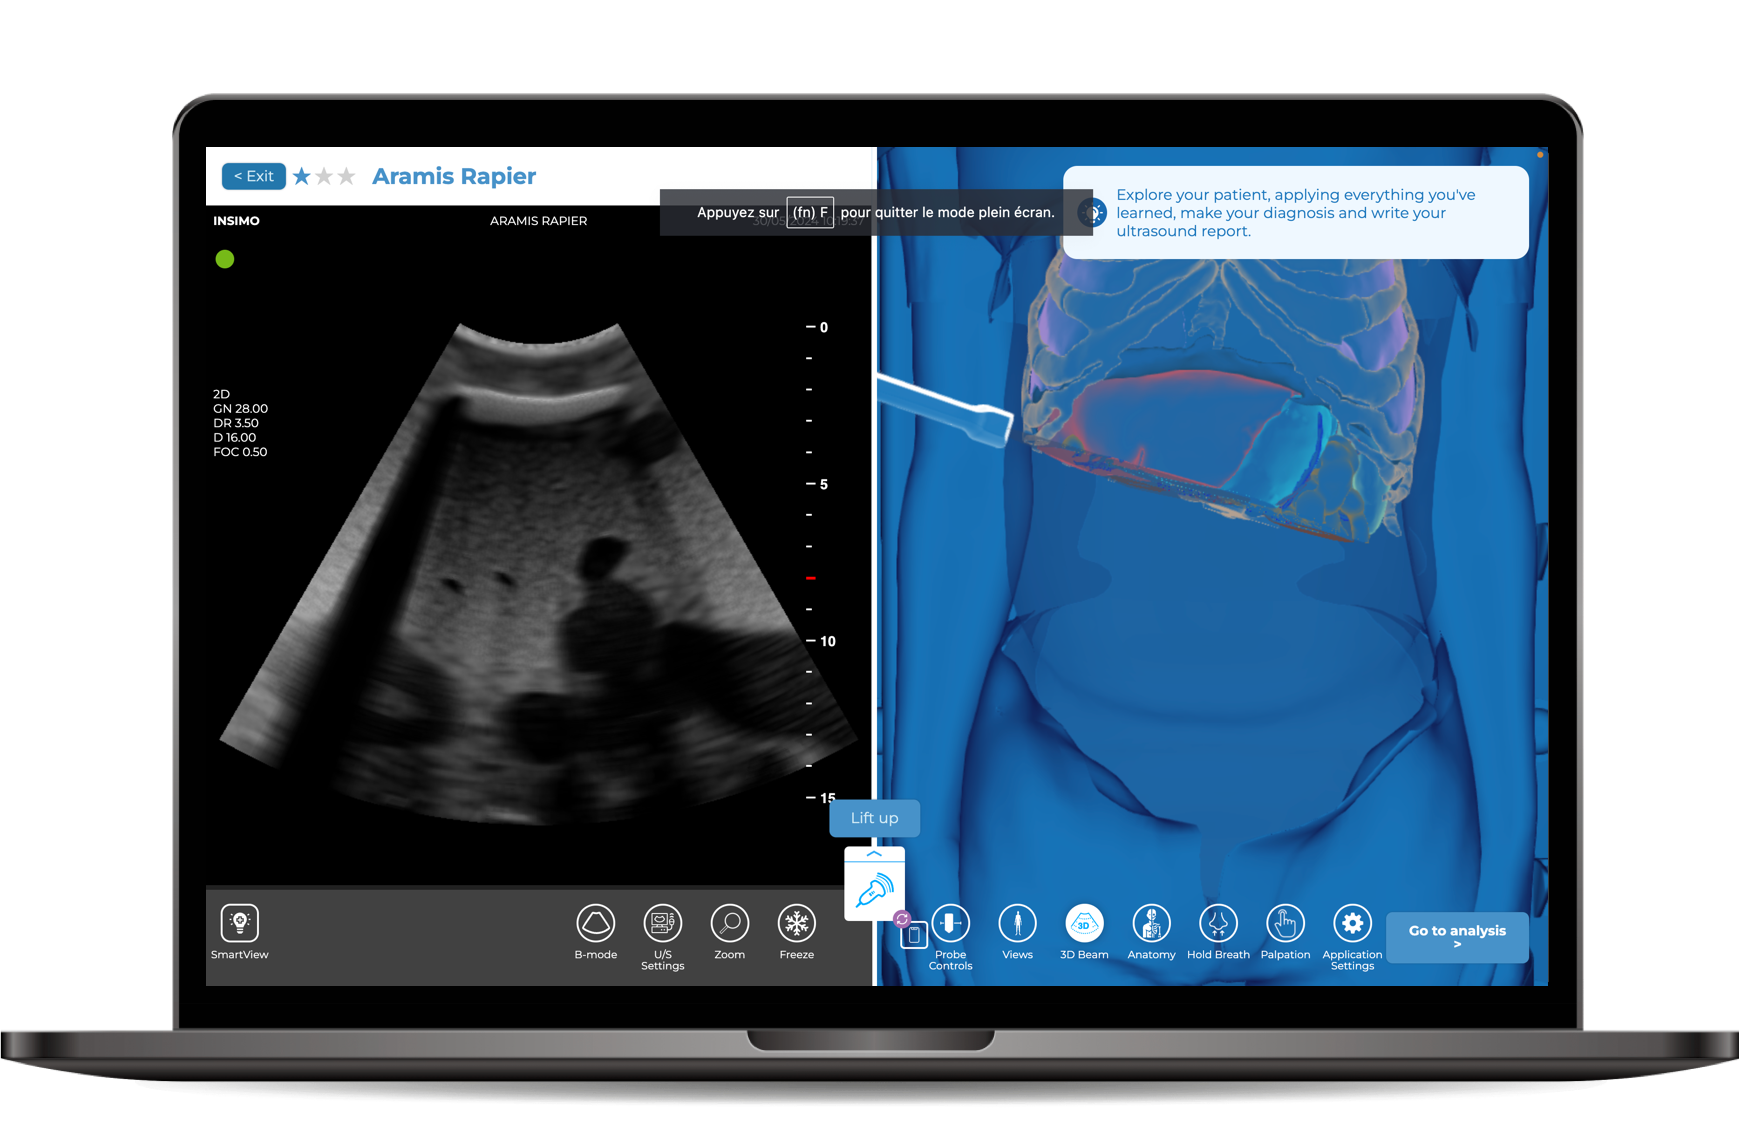
Main ultrasound windows according to the FAST procedure [1]
This protocol targets four specific areas where fluid may accumulate:
The pericardium, to search for cardiac tamponade.
The right upper quadrant, to detect fluid on the hepatorenal space (Morison’s pouch).
The left upper quadrant, to visualize the splenorenal space.
The pelvis, to identify fluid in the Douglas pouch or the vesicouterine recess [3].
Mastering the FAST Protocol
Choosing the right ultrasound probe
The selection and setting of probes are essential for obtaining optimal results [11]. A 3.5 to 5 MHz probe is suitable for most patients and allows for high-quality image acquisition in the vast majority of cases. Although in some patients, better images may be obtained with a linear or cardiac probe, this may require changing probes multiple times, which can result in losing valuable time in the FAST protocol. This is why the most commonly used probe is the convex probe.

The different probes available in diSplay U/S
Identify and scan the target zones
Evaluating the Right Upper Quadrant (RUQ)
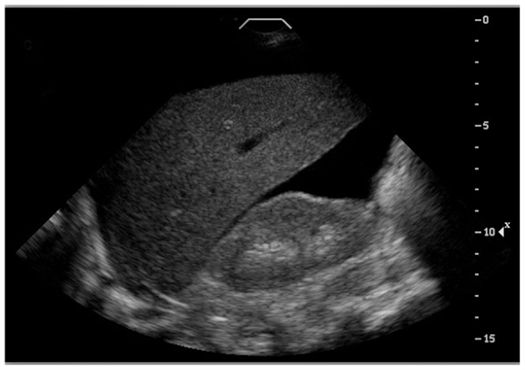
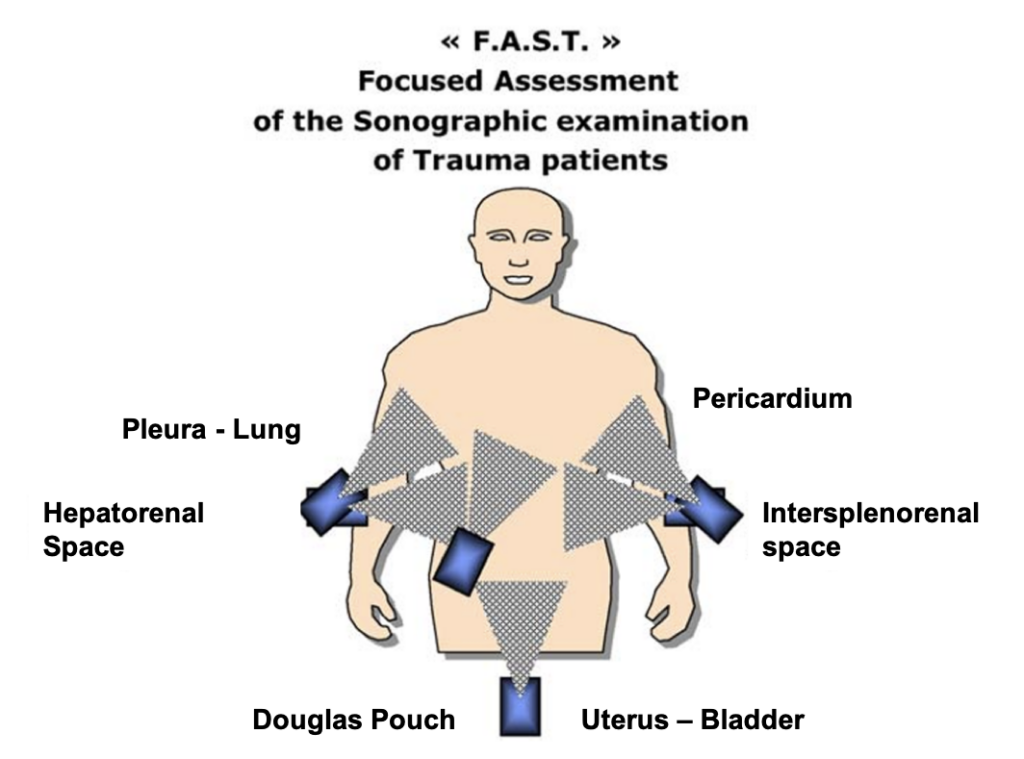
By placing the probe in the epigastric region, you should be able to assess the liver, diaphragm, and peritoneal cavity. One of the key areas to explore is Morrison’s pouch, which lies between the liver and the right kidney. The presence of free fluid in this space is a strong indicator of liver or renal trauma, potentially suggesting a rupture or hematoma [4].
To properly assess this area, identify the 8th and 11th intercostal spaces on the patient and place the probe at their level, ensuring it is positioned just above the rib. A more precise approach is to use the anterior axillary line as a guide to align the probe properly on the right flank. If the patient is able to do so, ask them to take a deep breath and hold it. This helps to better visualize the hepatorenal space, as inspiration causes the diaphragm to descend, allowing for clearer images of the liver and the area around the kidney. Then, gently sweep through Morrison’s pouch (the hepatorenal space) to check for the presence of free fluid [2].
Inverted ultrasound anatomy of the right upper quadrant and relevant anatomical structures (nysora.com)

RUQ exploration on diSplay U/S
Evaluation of the Left Upper Quadrant (LUQ)
This part of the ultrasound exam allows for the exploration of the spleen and the left diaphragm. The presence of free fluid around the spleen can indicate splenic trauma, a common complication following abdominal trauma [9].
To identify this area, you can use the anterior axillary line as a landmark, just as for the right upper quadrant (RUQ), but it is important to note that the abdominal cavity in the left upper quadrant is higher and further back. This means you will need to scan the 6th to 10th intercostal spaces to reach the area where the spleen and diaphragm are visible and to properly explore this region [11].
When you position the probe in this area, start by locating the spleen. Once you have visualized it, you can use this organ as an acoustic window to explore the surrounding structures. By following the curvature of the spleen, you should be able to identify the left kidney and its interface with the spleen. This will allow you to assess if free fluid is present in the space between the spleen and the kidney, which could indicate splenic trauma.
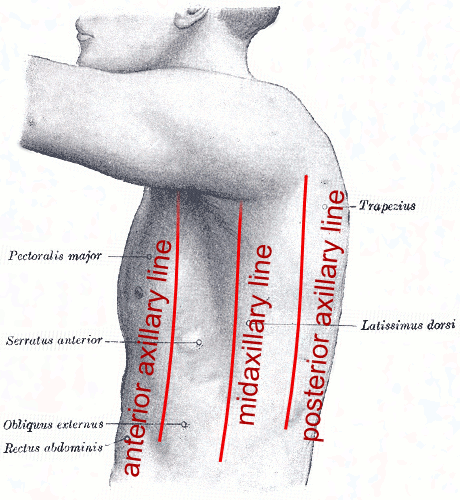
Axillary lines [5]

LUQ exploration on diSplay U/S
Evaluation of the pelvic region (suprapubic window)
Assessing the pelvic cavity is crucial for detecting the presence of free fluid, particularly in the Douglas pouch in women or the rectovesical area in men, which can indicate lower abdominal trauma or organ rupture, often related to pelvic injuries or trauma to the uterus or ovaries in women.
To explore this area, start by locating the pubic symphysis and place the probe just above it, positioning it horizontally to examine the pelvic cavity. It is important to consider the patient’s bladder status (empty or full), as this can affect the visibility of the pelvic region and may require you to adjust the ultrasound depth settings. If the bladder is full, it may obstruct the visualization of the Douglas pouch, but if it is empty, the view will be clearer, especially for observing fluid accumulation in the pelvic region. Then, sweep caudally and cephalically to obtain a complete view of the area.
In women, the area to examine is the rectouterine pouch, located behind the uterus and in front of the rectum. This is where free fluid often accumulates in cases of trauma. In men, the region to explore is the rectovesical space, located between the rectum and the bladder [12].

Pelvic region exploration on diSplay U/S
Evaluation of the pericardial view (subxiphoid window)
Examination of the area around the heart is crucial for detecting the presence of a pericardial effusion, which could lead to cardiac tamponade, a life-threatening emergency requiring prompt intervention. Cardiac tamponade occurs when fluid accumulates in the pericardium, compressing the heart and impairing its function, which can result in circulatory arrest if not treated quickly [6].
To visualize this area, begin by locating the xiphoid process, located at the base of the sternum, just below the rib cage. Use this landmark to position the probe just next to the xiphoid process, on the left side of the patient. This position allows for a view of the heart, particularly the pericardial area, between the heart and the diaphragm.
Place the probe along the longitudinal axis of the sternum, angling it slightly downward and to the left. The image obtained will allow visualization of the pericardial cavity, and even a small effusion in this area can be the cause of tamponade.

Pericardial region exploration on diSplay U/S
Correctly position the probe and adjust the parameters
One of the key elements to succeed in FAST ultrasound is properly positioning the probe to obtain clear and sharp views, maximizing the chances of detecting fluid collections.
The exact positioning of the probe and the choice of scanning angle directly depend on the specific anatomical structures you wish to examine [11].
It is also essential to adapt your approach based on the patient’s morphology.
For instance, for an obese patient, it may be necessary to adjust the probe angle or increase the depth of exploration to penetrate through the layers of fat. In contrast, for a thinner patient, the settings will differ. Additionally, the orientation of the probe may need to be adjusted to better visualize certain structures, such as the diaphragm, intercostal spaces, or pericardial areas [7].
It is important to adjust the gain to control the image brightness, avoiding images that are too dark or too bright. The image dynamics should be adapted to improve the visibility of internal structures by adjusting the contrast levels. Probe depth is a crucial parameter: too much depth can result in a loss of resolution, while insufficient depth might miss important structures. Lastly, the focus should be adjusted to focus on the specific area being evaluated, allowing for better definition of the anatomical structures [2].
Discover more tips on this topic in our article: How to adjust the parameters of the convex probe to perform a successful lung ultrasound?
Perform a quick scan of the areas
The scanning of the different stations should be done in a systematic, structured, and fluid manner. Each area of the abdomen and thorax must be carefully explored to avoid missing potential fluid collections [7]. Use a slow and continuous motion, following a well-defined path to cover all the important areas of the exam.
It is essential not to neglect difficult angles or less visible anatomical regions. For example, the intercostal spaces can be more challenging to visualize due to the presence of ribs, and some structures, such as the pouch of Douglas in women or Morrison’s space, may be more difficult to access. These areas are often the first to accumulate fluid in the event of trauma, and it is crucial to examine them thoroughly to avoid missing small amounts of free fluid [4].
One of the most critical aspects of FAST ultrasound is the ability to interpret the images quickly. The goal of this exam is to provide real-time information to make a fast clinical decision. To do this, an experienced operator should be able to perform the FAST ultrasound in under 5 minutes, quickly gathering the necessary data to assess the presence of a fluid collection and determine if urgent intervention is required [9].
Identify fluid collections
During the ultrasound examination, fluid collections appear as anechoic areas (black areas) because free fluid does not significantly reflect ultrasound waves. Unlike solid tissues, which create echogenic images (white or gray areas), fluid, being more homogeneous, does not produce echoes and therefore appears as black spots on the ultrasound screen [12].
The detection of free fluid using the FAST ultrasound relies on the ability to identify these anechoic areas in specific anatomical spaces, allowing for the rapid diagnosis of severe internal injuries and the making of urgent decisions.